Disclosure: As an Amazon Associate, we earn from qualifying purchases. If you click a link on this page and make a purchase, we may receive a small commission at no extra cost to you.
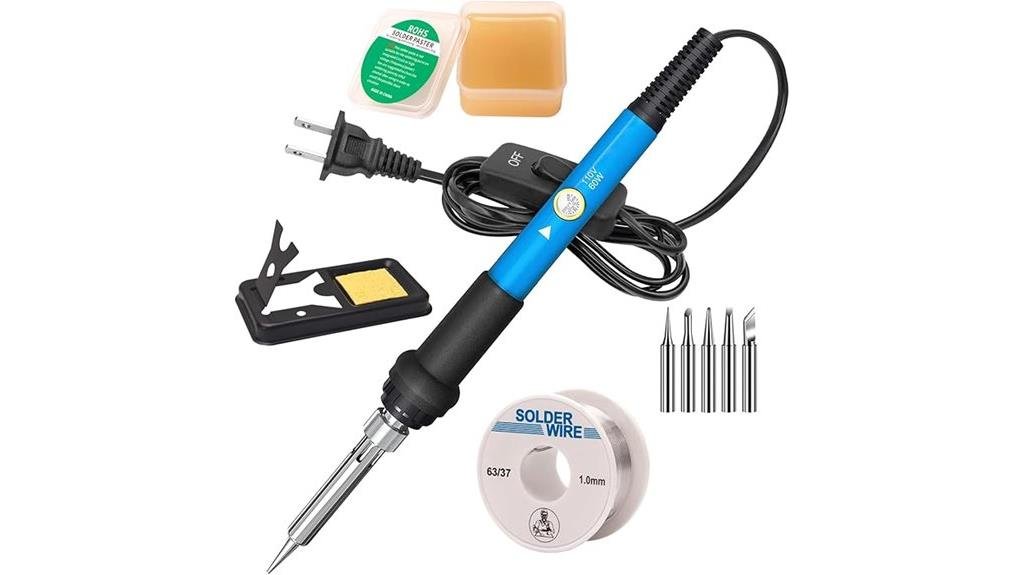
A basic soldering kit should help you finish small repairs without forcing you to buy a full bench station. The LDK 60W soldering iron kit combines a ceramic heater, a listed 200–450°C adjustment range, five tips, and starter supplies in one compact package. Its simple controls suit beginners and occasional repair work, but the lack of a digital temperature display limits precision. This review helps you decide whether that tradeoff fits your projects and workspace.
Quick Verdict
Rating: Recommended with caveats
Best For: Students, hobbyists, and occasional electronics repairs
Bottom Line: The kit gives you a fast-heating 60W iron and useful starter accessories in a portable format. Choose a digital soldering station instead if you need verified temperature accuracy, stronger thermal recovery, or frequent heavy-duty use.
Key Specifications
| Specification | Detail |
|---|---|
| Brand | LDK |
| Product type | Adjustable plug-in soldering iron kit |
| Rated power | 60W |
| Listed voltage | 110V |
| Heating element | Ceramic |
| Temperature range | 200–450°C (392–842°F), as listed |
| Heat-up time | About 30 seconds, as listed |
| Iron weight | 100 g, as listed |
| Included tips | Five interchangeable tips |
| Included supplies | 0.8 mm solder wire, flux, sponge, and stand |
| Main limitations | No digital temperature readout; exact certifications, solder composition, warranty, and replacement-tip fit were not independently confirmed |
Key Takeaways
- The listed 30-second heat-up time makes the iron practical for short repairs and quick workshop tasks.
- The 200–450°C adjustment range covers many common soldering jobs, but the dial does not show the actual tip temperature.
- Five tips, solder, flux, a sponge, and a stand give a beginner the main items needed to start practicing.
- The listed 100 g iron should feel lighter than a full soldering handle attached to a bench station.
- The 110V rating and modest 60W format are better suited to small joints than large connectors, thick wire, or broad metal surfaces.
What Is the LDK 60W Soldering Iron Kit?
The LDK kit is a corded, adjustable soldering iron package built around a 60W ceramic heating element. Instead of using a separate control station, it places the temperature dial and power switch on the iron. That design saves desk space and keeps the kit easy to store.
The package is aimed at basic PCB work, wire repairs, small household electronics, and light craft projects. You also get five tips and several starter accessories, so you do not need to source every small item separately before your first practice joint.
This is still a simple iron rather than a calibrated soldering station. The temperature dial gives you a setting range, but it does not confirm the exact temperature at the tip or show how much the tip cools when it touches a joint.
Who Should Buy It?
Best For
- Beginners learning basic tip care and joint preparation
- Hobbyists repairing small wires, toys, headphones, or circuit boards
- Students who need a compact kit for occasional project work
Skip If
- You need a digital display or verified tip-temperature accuracy
- You regularly solder thick wire, large terminals, metal seams, or large ground planes
- Your power supply is 220–240V and the exact product is rated only for 110V
Before You Buy: Confirm the voltage, package contents, safety markings, solder composition, and warranty on the live Amazon listing. The exact ASIN and its current documentation could not be independently verified during this review refresh.
Key Features and Performance
Heating Speed and Temperature Control
The article lists a heat-up time of about 30 seconds. That is useful when you need to repair one wire or replace a small component without waiting for a large station to warm up. Actual heat-up time can still vary with the chosen tip, room temperature, power supply, and starting temperature.
The adjustment dial spans 200–450°C (392–842°F). This broad range lets you lower the setting for delicate work or raise it when a larger joint draws heat away from the tip. However, the dial is not a digital temperature measurement, so you should treat each position as an approximate setting.
A 60W rating is reasonable for many small electronics jobs. It does not guarantee fast recovery on a large connector or broad copper area, where the joint can pull heat from the tip faster than the heater replaces it.
Tip Selection and Included Accessories
Five interchangeable tips give you more flexibility than a one-tip starter iron. A narrow tip can reach small PCB pads, while a wider tip can transfer heat more effectively to a wire splice or larger terminal. The best tip is usually the largest one that still fits the joint without touching nearby parts.
The kit also lists 0.8 mm solder wire, flux, a sponge, and a heavy-duty stand. These items reduce the amount of extra gear you need for a first session. The article does not provide verified details about the solder alloy, flux chemistry, tip dimensions, or consumable quality, so check the labels before use.
Handling, Controls, and Portability
The listed 100 g iron keeps the handheld part relatively light. That can help during short jobs where a bulky handle causes fatigue or makes precise positioning harder. The tradeoff is that the temperature control stays on the tool, so you may need to pause and look at the dial when changing settings.
An on/off switch gives you a direct way to cut power without unplugging the iron after every joint. You should still unplug it when the session ends, let it cool in the stand, and store it only after the tip and barrel are fully cool.
Compatibility and Electrical Safety
The source article lists the iron for 110V power. Do not plug a 110V-only heating tool directly into a 220–240V outlet. A mismatched supply can damage the iron and create a fire or shock risk.
A converter should not be your default solution unless the manufacturer confirms that setup for this exact model. A locally rated soldering iron is the safer and simpler choice for a 220–240V workshop.
No CE, UL, RoHS, or other certification could be confirmed from independent product documentation. The included solder was also not verified as lead-free. Review the packaging and seller documentation before relying on any safety or material claim.
How It Performs in Real Use
For PCB Repairs
The adjustable heat and narrow-tip options should suit through-hole components, loose wires, switches, and basic board repairs. Small PCB work rewards good preparation more than maximum heat. Clean the pad, use a properly tinned tip, and keep contact time short to reduce the chance of lifting a pad.
For Headphones, Toys, and Small Wires
The compact handle and 0.8 mm solder wire fit fine cable repairs better than thick solder intended for large electrical joints. Strain relief still matters after the joint cools. Solder alone should not carry repeated pulling or bending loads.
For Jewelry and Light Craft Work
The kit may handle small craft joins that use solder compatible with the iron’s temperature range. Jewelry metals, fluxes, and solder alloys vary, so confirm that an electric iron is appropriate for the material. Large metal pieces and long stained-glass seams may absorb more heat than this compact iron can deliver steadily.
For Heavy-Gauge and High-Thermal-Mass Work
Thick wire, battery tabs, large terminals, metal chassis work, and broad ground planes can expose the limits of a 60W pencil-style iron. Raising the dial may not solve the problem if the tip cannot maintain heat at the joint. A higher-power station with a larger tip is a better match for frequent heavy work.
How to Use It Correctly
- Confirm the power rating. Match the iron’s listed voltage to your outlet before plugging it in.
- Check the solder label. Identify the alloy and flux type instead of assuming the included wire is lead-free or suitable for every project.
- Choose the right tip. Use a tip that contacts enough of the joint to transfer heat efficiently without touching nearby components.
- Tin the tip. Apply a thin solder coating after the iron warms. A clean, tinned surface transfers heat better than a dry, oxidized tip.
- Heat the joint, not only the solder. Touch the tip to both surfaces, then feed solder into the heated joint.
- Use the stand every time. Never place a hot iron directly on a desk, cable, plastic part, or work mat that is not heat resistant.
- Work with ventilation. Keep fumes away from your face and follow the solder and flux manufacturer’s handling guidance.
Pro Tip: Start with a moderate setting and a properly sized tip. A larger contact area often transfers heat faster than turning a tiny tip to the highest setting.
Pros and Cons
Pros
- Listed 30-second heat-up supports quick repair sessions
- 200–450°C adjustment range covers varied small-project needs
- Five tips help match the contact area to the joint
- Starter solder, flux, sponge, and stand are included
- Listed 100 g iron is compact and easy to store
Cons
- No digital temperature display or verified calibration
- 60W pencil design may struggle with large thermal masses
- 110V rating limits direct use in many countries
Is It Worth the Price?
The LDK kit fits the budget starter category because it combines the iron, tips, stand, cleaning sponge, solder, and flux. It offers strong value for the price when you need one compact package for light repairs and practice work. The included accessories also reduce the risk of forgetting a basic item during your first setup.
Value depends on the live listing matching the specifications and package described here. A digital station costs more but gives you clearer controls and is usually a better long-term choice for frequent work. This kit makes more sense when portability, simplicity, and a low entry cost matter more than exact temperature feedback.
How It Compares to Alternatives
Compared with a digital bench station, this LDK iron takes less space and includes more starter supplies in one package. A station is the better option when you want a temperature display, a stable holder, easier control changes, or stronger performance on repeated joints.
A portable USB-C smart iron can be easier to carry and may offer digital control, but it often needs a compatible high-power charger. The LDK kit makes the most sense when you want a simple wall-powered iron and do not need advanced controls.
Frequently Asked Questions
Is the LDK 60W soldering iron kit suitable for beginners?
Yes, the simple dial, on/off switch, five tips, and included starter supplies suit basic practice and small repairs. A beginner still needs safe handling, ventilation, tip-care habits, and the correct temperature for the solder and component.
Does the dial show the actual tip temperature?
No. The iron provides an adjustable 200–450°C range, but it has no digital readout. The selected dial position and the real tip temperature may differ during warm-up or when a joint draws heat from the tip.
Can it solder thick wire or large connectors?
It may handle some medium-size joints with the correct tip and preparation, but heavy-gauge wire and large terminals can pull heat away quickly. Choose a higher-power station when those jobs are common rather than occasional.
What comes in the package?
The article lists the 60W iron, five interchangeable tips, 0.8 mm solder wire, flux, a sponge, and a stand. Confirm the live Amazon package details because seller bundles and included quantities can change.
Can you use this 110V iron on 220–240V power?
Do not connect a 110V-only iron directly to 220–240V power. Use a locally rated model unless the manufacturer specifically approves a compatible converter for this exact iron.
Is the included solder lead-free and RoHS compliant?
That could not be confirmed from independent documentation. Check the solder spool and packaging for alloy details and RoHS information before use, and follow the stated handling instructions.
Are replacement tips easy to find?
The kit includes five tips, but compatibility with separately sold replacements was not verified. Confirm the shaft size, heater design, and seller compatibility statement before ordering extra tips.
What warranty and safety certifications does it have?
A warranty period and formal certification details could not be independently verified. Review the current Amazon listing, packaging, and seller terms before purchase, especially when certification is required for a school or workplace.
The Bottom Line
The LDK 60W soldering iron kit is worth considering for students, hobbyists, and light electronics repairs that benefit from a compact, ready-to-use package. Its main strengths are the broad listed temperature range, quick warm-up, and included accessories, while its main limitations are the lack of a digital readout, 110V compatibility, and uncertain performance on heavy joints.
Skip it for frequent professional use or large thermal-mass work. A digital soldering station will usually provide better control and a clearer upgrade path.
Ready to Buy?
Check the latest price, voltage, package contents, and product details before you decide.