How to Attach and Use a Bumprider Ride-On Board Safely
By SellySell Editorial Team | Last updated: May 28, 2026
Quick answer: To use a Bumprider ride-on board safely, attach the adapters to the stroller chassis or rear bar, not to the brakes or any moving part. Adjust the struts evenly, set the board level, tighten the straps, test the brake, and check every clip, hook, screw, and wheel before your child steps on.
A ride-on board can make short trips easier when one child still needs the stroller and an older child gets tired. It also changes how your stroller handles, so the setup needs more than a quick clip-on. This guide shows you how to fit, adjust, inspect, remove, and store a Bumprider Ride-On Board with safety first.
Key takeaways:
- Use the board only for a child who fits the age and weight limits for your exact model.
- Attach the connectors to the chassis or rear bar only, never to the brake or moving stroller parts.
- Keep the board level so it does not block the brake, wheel lock, folding joint, or wheels.
- Retighten the straps after the first short test walk because new strap placement can settle.
- Remove or hang up the board when it makes folding, storage, or stroller control difficult.
Before You Start: Fit, Age, Weight, and Safety Checks
Before you attach the board, confirm that the child and stroller are both suitable. The official Bumprider product page lists the recommended age as 2 to 5 years and the maximum weight as 30 kg / 66 lbs. You can check the current product specification on the official Bumprider Ride-On Board page.
The instruction manual also warns you not to attach the board to the brakes or to any moving part of the stroller. Use the stroller chassis or rear bar only if that position keeps the brake, wheel lock, axle, and folding system clear. You can review the warning in the Bumprider instruction manual.
| Safety check | What you need to confirm | Why it matters |
|---|---|---|
| Child fit | Your child is within the age and weight limits and can stand steadily. | A child who cannot balance may slip or lean too far back. |
| Attachment point | The straps attach to the chassis or rear bar, not the brake or moving parts. | Brake or moving-part contact can affect stroller control. |
| Board angle | The standing surface sits flat when the stroller is on level ground. | A tilted board can make your child lean or slide. |
| Brake clearance | The stroller brake still locks and releases without touching the board. | Blocked brakes create a direct safety risk. |
| Walking space | You can walk without kicking the board on every step. | Poor walking space makes the stroller harder to steer. |
Bumprider Ride-On Board Features and Limits
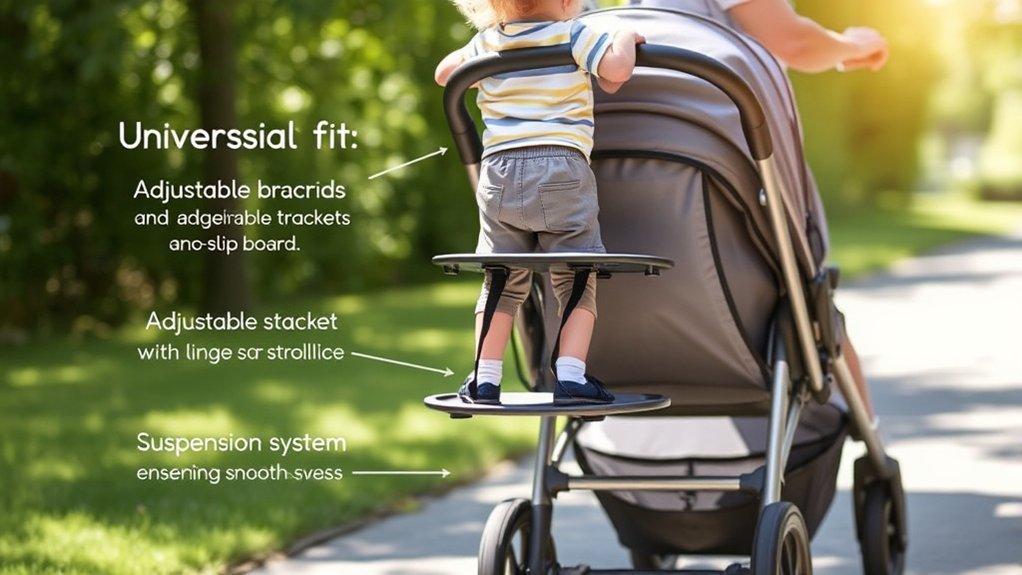
The Bumprider Ride-On Board gives an older child a standing platform behind the stroller. Bumprider describes the board as universal because the arms adjust in width, length, and height. That adjustability helps it fit many stroller frames, but you still need to test your exact stroller before you use it with a child.
The main parts you will handle during installation are the board, wheels, adjustable arms, locking points, connector straps, clips, and hooks. The non-slip standing area helps your child keep both feet in place. The wheels and suspension help the board roll over normal pavement, but they do not make the board suitable for running, stairs, escalators, steep slopes, or rough ground.
A safe fit means the board is tight, level, clear of the brake, and easy for you to control while walking.
Use the board for short walking trips, school drop-offs, park paths, shopping areas, and travel days when your older child may need a quick rest. Do not treat it like a second stroller seat. Your child should stand still, face forward, hold on, and step off before you fold, lift, or carry the stroller.
Properly Adjusting the Attachment Struts

After you place the Bumprider Ride-On Board near the stroller, adjust the attachment struts before you tighten the straps. The goal is simple: both arms should reach the stroller evenly without pulling the board to one side.
- Turn the board over on a flat surface so you can see the arm adjustment points.
- Set the arm width to match the distance between the safe attachment points on your stroller.
- Keep both arms even so the board stays centered behind the stroller.
- Check that the board sits behind the wheels without touching the brake, wheel lock, axle, or folding parts.
- Tighten the struts only after the board looks centered and level.
If your board uses a three-hole peg system, choose the hole position that gives the straightest arm angle. Do not force the arms wider than they naturally allow. Forced placement can twist the connectors and make the board feel loose during a walk.
Check the width again after your first short test walk. Straps can settle, and the arms may need one small adjustment before the board feels solid.
Ensuring the Right Tilt Position

The tilt position controls how flat the standing platform feels under your child’s feet. Set the tilt with the stroller on level ground, not on a slope or curb. A flat board helps your child stand naturally and helps the wheels track straight behind the stroller.
The board should sit above or behind the brake area without pressing on it. If the board touches the brake, blocks a wheel lock, or rubs against the stroller frame, stop and change the attachment position before use.
Adjusting the Gear Wheel or Angle Locking Point
Adjusting the gear wheel or angle locking point is a small step, but it affects comfort and safety. Loosen the side screws only enough to adjust the tilt. Move the angle until the board sits level behind the stroller. Then tighten the side screws firmly before your child stands on the board.
Use this table as a quick guide:
| Step | Action | Safety check |
|---|---|---|
| 1. Loosen | Loosen the two side screws or locking points. | Do not remove small parts near children. |
| 2. Adjust | Move the tilt until the board looks level. | Keep the stroller on flat ground. |
| 3. Check clearance | Confirm the board does not touch the brake or moving parts. | Test the brake before use. |
| 4. Secure | Tighten the screws or locking points again. | No side should feel loose. |
| 5. Test | Push the empty stroller a few steps. | Listen for rubbing and check wobble. |
Confirming a Secure Fit
A secure fit means the board does not slide, sag, twist, or block stroller controls. Stand behind the stroller and pull the board gently left, right, up, and down. Small movement from the suspension may feel normal, but the connectors should not shift on the frame.
Next, lock and unlock the stroller brake. Fold and unfold the stroller only if your setup allows it with the board attached. If folding pulls on the straps or bends the arms, remove the board before folding.
Ask your child to step on only after your empty-stroller test feels stable. Keep one hand on the stroller handle and use the first few minutes as a slow test walk.
Securely Attaching the Adapters
Use the two adapters that come with the Bumprider package. Place them on the stroller chassis or rear bar where the straps can wrap tightly and sit flat. Do not place them on a brake lever, wheel lock, folding hinge, suspension part, or any part that moves when you push or fold the stroller.
The adapters should sit at the same height on both sides when possible. Uneven adapter height can make the board lean and pull to one side.
Proper Strap Placement
Wrap each strap around the stroller bar, feed it through the clip, and pull it tight. The strap should lie flat against the frame without twists. A twisted strap can loosen faster and may make the adapter slide.
After you clip the strap, tug it by hand. If it moves easily, reposition it on a straighter section of the frame and tighten it again. Use the hooks at the ends of the arms only after the adapters sit firmly in place.
Keep the strap path clear of the stroller brake cable, wheel lock, folding release, and storage basket fabric. A strap that rubs against these parts can wear down or interfere with normal stroller use.
Ensuring a Tight Fit
After the strap placement looks correct, focus on strap tension. Pull each strap until the adapter feels snug against the stroller frame. The board should not swing freely when you move it by hand.
Retighten both sides evenly. If one side feels tighter than the other, the board may track crooked behind the stroller. Adjust one side at a time until the board sits centered.
Before you leave, complete this quick test:
- Pull both adapters by hand and confirm they do not slide.
- Press the stroller brake and confirm it works normally.
- Spin the board wheels and check for rubbing.
- Push the empty stroller forward and backward for a few steps.
- Ask your child to step on only after the empty test passes.
Making Final Adjustments for Safety
Before each ride, make a final safety check. Press the hook trigger if you need to adjust the arm position, then confirm the hook locks back into place. Keep the standing surface facing upward and the board level before your child steps on.
Check every part in this order:
- Adapters: They should sit tight on the stroller frame.
- Straps: They should lie flat with no slack or twists.
- Hooks: They should lock fully into the adapter points.
- Screws or locking points: They should feel tight and even.
- Brake: It should lock and release without touching the board.
- Wheels: They should roll freely without scraping the stroller.
- Child position: Your child should stand with both feet flat and hold on.
Safety note: Stop using the board if you see cracked plastic, torn straps, loose hooks, missing screws, jammed wheels, or a worn standing surface. Replace damaged parts before the next trip.
Use slower turns and longer stopping distance when your child rides on the board. Extra weight at the back can change how the stroller steers, especially on slopes, curbs, crowded sidewalks, and uneven pavement.
Tips for Easy Detachment and Storage
Once your walk is over, remove or store the board in a way that protects the straps and keeps the stroller easy to handle. Press the trigger on the hooks to release the board from the adapters. Then loosen the strap clips if you need to remove the adapters from the stroller frame.
For daily use, you may keep the adapters on the stroller if they do not block folding, braking, or storage. For travel or long-term storage, remove the board and lay it flat. Avoid placing heavy items on top of it because pressure can bend the arms or damage the wheels.
Store the board in a dry place away from direct sunlight and heat. Moisture can affect straps and metal parts over time. Heat can weaken plastic parts and shorten the life of the standing surface.
Common Installation Mistakes to Avoid
Most ride-on board problems come from small setup mistakes. Fixing them early makes the stroller easier to push and safer for your child.
| Mistake | What can happen | Exact fix |
|---|---|---|
| Attaching near the brake | The board may block the brake or rub during use. | Move the adapters to the chassis or rear bar away from moving parts. |
| Leaving strap slack | The adapter can slide when your child steps on. | Rewrap the strap flat and pull it tight through the clip. |
| Setting uneven arm width | The board may lean or pull to one side. | Measure visually from both sides and adjust the struts evenly. |
| Ignoring board tilt | Your child may lean backward or forward while standing. | Adjust the angle until the board sits level on flat ground. |
| Skipping the empty test | You may miss rubbing, wobble, or brake interference. | Push the empty stroller first, then let your child step on. |
Troubleshooting: Fix Wobble, Rubbing, or Poor Clearance
The Board Wobbles
Remove your child from the board first. Tighten both straps, check that the adapters do not slide, and confirm that both arms are set to the same width. If wobble remains, move the adapters to a straighter and more solid part of the stroller frame.
The Board Rubs the Brake or Wheels
Stop using the board until you change the fit. Raise or lower the arm angle, adjust the tilt, or move the adapters away from the brake area. Do not keep using the board if it touches any brake or moving part.
You Keep Kicking the Board While Walking
Shorten or adjust the arm position if your setup allows it. You can also slow your stride and stand slightly farther from the stroller handle. If the board still causes poor walking posture, remove it for that stroller setup.
Your Child Feels Unstable
Check the child’s stance first. Both feet should stay flat on the board, and your child should hold the stroller or handle area. If the board is level but your child still struggles to balance, wait until your child is older or more confident standing during movement.
Frequently Asked Questions
Can the Ride-On Board Fit Any Stroller Model?
Bumprider markets the board as a universal stroller board, but you still need to test your exact stroller. The board needs solid chassis or rear bar attachment points. It also needs enough clearance from brakes, wheels, folding joints, suspension parts, and car seat adapters.
What Age Range Is Suitable for Using the Ride-On Board?
The official Bumprider product information lists the recommended age range as 2 to 5 years. Age alone is not enough. Your child should also stand steadily, follow simple directions, keep both feet on the board, and hold on during the ride.
How Much Weight Can the Ride-On Board Support?
The official Bumprider specification lists a maximum weight of 30 kg / 66 lbs. Do not exceed that limit. Extra weight can make the board harder to control and can put too much stress on the straps, adapters, wheels, and stroller frame.
Is the Ride-On Board Easy to Clean and Maintain?
Yes, routine cleaning is simple. Wipe the board with a damp cloth after normal use. Use mild soap for dirt on the standing surface, then dry the board before storage. Also check the straps, clips, hooks, screws, wheels, and non-slip surface before each outing.
Can I Use the Ride-On Board With a Car Seat Attached?
You can use it only if your stroller manufacturer allows that setup and the board still has safe clearance. Test the stroller empty first. The board must not touch the car seat adapter, brake, wheel lock, folding joint, wheel, or any moving stroller part.
Can I Attach the Bumprider to the Stroller Brake Bar?
No. The instruction manual warns you not to attach the Bumprider to the brakes or to any moving part of the stroller. Use the chassis or rear bar only when the straps can sit tightly and safely without blocking stroller function.
Why Does My Ride-On Board Wobble?
Wobble usually comes from loose straps, uneven strut width, weak adapter placement, or a tilt angle that is not level. Remove your child from the board, retighten the adapters, center the arms, check the screws, and test the empty stroller again.
Can My Child Sit on the Bumprider Board?
Use the board only in the way your specific model allows. A standard ride-on board works as a standing platform. If your product includes a seat unit, install and use the seat only according to the official instructions for that model.
Should I Remove the Board Before Folding the Stroller?
Remove the board if it blocks folding or puts pressure on the arms, straps, or adapters. Some setups allow the board to hang up when not in use, but folding safety depends on your stroller shape and the board position.
How Often Should I Check the Ride-On Board?
Check the board before every outing. Confirm that the straps are tight, hooks are locked, screws are secure, wheels roll freely, and the brake works normally. Do a deeper inspection after travel, storage, rain, rough pavement, or any sudden impact.
Sources Checked
Conclusion
A Bumprider Ride-On Board works best when you treat setup as a safety routine, not a one-time task. Attach the adapters to the stroller chassis or rear bar, keep every strap tight, set the board level, and confirm that the brake and moving parts stay clear.
Before your next walk, do one empty-stroller test, then let your child step on only after the board feels stable. If the board wobbles, rubs, blocks the brake, or makes the stroller hard to control, stop and adjust the setup before you continue.