Disclosure: As an Amazon Associate, we earn from qualifying purchases. If you click a link on this page and make a purchase, we may receive a small commission at no extra cost to you.
A cracked plastic bumper cover or storage bin may look easy to fix, but the wrong filler rod can leave a weak joint. The GNI W150 Plastic Welder pairs a 150W ceramic heater with a digital temperature display, a setting lock, four listed tips, and 106 rods. It gives you a useful starter setup, not an automatic fix for every plastic. This review covers the listed kit contents, the repairs it suits, and the jobs you should leave to a professional.
Quick Verdict
Rating: 8.4/10 (editorial, specification-based score; not a hands-on test result)
Best For: Small, non-structural repairs to identified ABS, PP, PE, or other suitable plastics, including trim, bins, and workshop items.
Bottom Line: The W150 offers adjustable heat and a generous rod-and-accessory kit for basic repairs. You still need the correct plastic match, careful preparation, and practice, and it is not intended for safety-critical repairs.
| Specification | Detail |
|---|---|
| Brand | GNI |
| Model | W150 (retailer-listed for ASIN B0DJ8C5TJP) |
| Product type | Corded, pen-style plastic welding and soldering repair kit |
| Kit designation | 13-in-1 (marketing description, not 13 identical tools) |
| Heating power | 150W ceramic-core heater |
| Advertised warm-up | About 15 seconds; seller claim, not independently measured |
| Advertised temperature range | 200°C to 600°C (392°F to 1112°F) |
| Temperature controls | Digital display, adjustable setting, and temperature lock |
| Heater housing | Steel tube with six ventilation holes, per seller description |
| Included tips | 4 tips in 3 types for the referenced kit; verify bundle before buying |
| Welding rods | 106 total: 56 material-listed rods plus 50 colorful rods |
| Rod materials identified | ABS, PP, PE, TPE, PC, PUR, and PA appear in the seller description |
| Reinforcement and prep | 5 mesh pieces, 3 sandpaper pieces, and 5 foil-tape pieces are listed |
| Other accessories | Stand, screwdriver, and metal brush |
| Grip and size | Non-slip pen-style handle; original product description lists 18 cm body length |
| Primary uses | Non-structural repairs on properly identified plastic and practice pieces |
| Electrical note | Check the voltage printed on the delivered tool before plugging it in |
| Care and safety | Cool before changing tips; use local fume extraction, eye protection, and a heat-safe stand |
What Is the GNI Plastic Welder?
The GNI W150 is an airless, contact-tip plastic welder. Its heated tip softens compatible filler rod and the nearby plastic so you can work along a crack or fill a small missing area. Unlike a hot-air system, it puts heat directly through the tip rather than blowing hot gas across a seam.
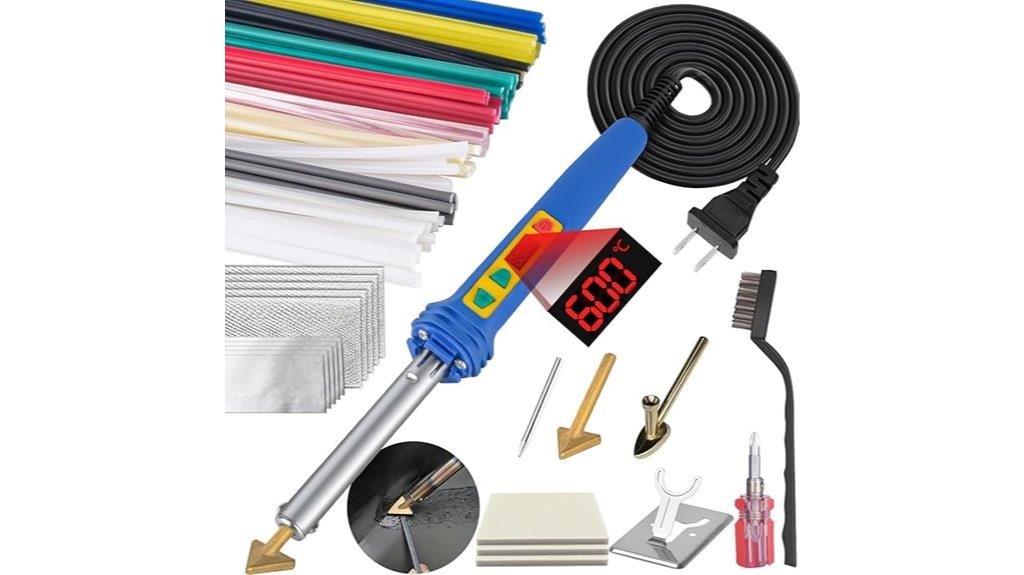
GNI markets this as a 13-in-1 repair kit with a 150W ceramic heating core, digital display, temperature lock, 106 rods, four listed tips, and preparation tools. The rod assortment helps you try a suitable material before buying larger packs, while the stand and mesh support safer setup and selected repairs.
This is a specifications-based editorial assessment, not a report of hands-on welding tests. The stated warm-up time, operating range, and included counts come from seller descriptions; actual results will depend on the material and your technique. The kit is for controlled DIY work, not certified structural or safety repairs.
Key Takeaways
- Its 150W ceramic heater and claimed 15-second warm-up favor quick, small repair jobs; warm-up was not independently measured.
- The adjustable 200°C to 600°C setting and lock offer more control than a simple fixed-heat tool, but do not guarantee the temperature at the weld.
- The 106 rods are listed as 56 material-specific rods plus 50 colorful rods; color alone does not identify the polymer.
- Four listed tips, mesh, sanding pieces, foil tape, and a stand make the kit more useful for learning and surface preparation.
- Choose the correct rod and method first. Skip safety-critical vehicle parts, uncertain plastics, and repairs where failure could cause harm.
Before You Buy: Identify the plastic and confirm that the selected kit includes the tips and rods you need. Do not use a DIY weld on crash structures, sensor-sensitive bumper areas, stressed kayak hulls, fuel parts, electrical safety parts, or food-contact items.
Who Should Buy It?
Best For
- DIY users fixing low-stress bumper trim, plastic covers, bins, and hobby projects after checking material codes.
- Beginners who want visible, adjustable heat settings and several tip shapes for practice.
- Buyers who prefer rods, mesh, tape, sandpaper, and a stand in one kit instead of separate purchases.
Skip If
- You need a vehicle-maker-approved repair near radar, parking sensors, crash structures, or airbags.
- You want to repair a load-bearing or water-critical kayak hull, food container, or fuel-system part.
- You cannot identify the plastic or lack a ventilated, heat-safe place to practice.
Heating Performance and Temperature Control Features
The W150 has a 150W ceramic heating core. Seller descriptions claim it can reach a selected temperature in about 15 seconds. Treat this as an advertised warm-up figure, not a promise for every setting or workroom condition. The six vents in the metal heater tube are intended to reduce heat transfer toward the grip, but the tip and metal neck remain very hot.
The stated range is 200°C to 600°C (392°F to 1112°F), with a digital display and temperature-lock function. A locked setting helps you avoid accidental adjustments as you follow a crack. It does not prove that the base plastic and filler rod have reached the same temperature, and the display is not an independent measurement of weld strength.
Start on a matching offcut at the low end of a suitable range and increase heat only when the material will not soften and fuse as expected. A fine tip can limit damage on thin ABS-type trim; a wider tip may suit a longer, thicker seam. Stop if the plastic smokes, bubbles, chars, collapses, or gives off strong fumes.
What’s Included in the Complete Repair Kit
The W150 package is more than a bare heating tool. Several retailer listings describe a 13-in-1 set built around the 150W welder, 106 rods, four tips, mesh, sanding pieces, foil tape, a stand, screwdriver, and brush. You can prepare a small crack, try different contact shapes, and then smooth the cooled area without buying every basic accessory separately.
The rod count needs a closer look: the described 106 pieces consist of 56 rods labeled for several plastic families and 50 colorful rods. Do not assume a colored rod is ABS, PP, or PE without checking its material marking. A few reseller pages describe five tips rather than four, so verify the photo and package list for the exact option you order.
| Component | Quantity | Why It Matters |
|---|---|---|
| Plastic welding tool | 1 | 150W contact-tip tool with digital heat controls. |
| Material-listed welding rods | 56 | Listed for ABS, PP, PE, TPE, PC, PUR, and PA; check individual markings. |
| Colorful welding rods | 50 | Color choice does not confirm polymer compatibility. |
| Interchangeable tips | 4 listed | Three described tip types; seller packages may differ. |
| Wire mesh | 5 pieces | Backing or reinforcement on suitable non-critical repairs. |
| Sandpaper | 3 pieces | Preparation and smoothing after cooling. |
| Foil tape | 5 pieces listed | Temporary support or masking where appropriate. |
| Other accessories | Stand, screwdriver, metal brush | Tool placement, hardware changes after cooling, and tip cleaning. |
Tip Selection and Material Matching
A good repair starts with the molded material code on the part, not a guess based on color or flexibility. Use a PP rod with PP and an ABS rod with ABS. Mixed automotive materials, including PP blends and TPO, may need a method or filler recommended for that exact substrate. A neat-looking bead can still separate later if the plastics do not bond properly.
The listed four tips come in three types. Select a narrow contact shape for a small crack or tight corner, and a flatter or wider face for a broad seam. Contact-tip welding can be slower on large areas than a suitable hot-air or nitrogen system; do not attempt to compensate by leaving the tip on the material until it burns.
- ABS: Match the rod to the molded code and practice with brief, steady passes to limit distortion.
- PP and PE: Match the exact polymer and test bond quality only after the joint has cooled. Some blends need different repair materials.
- PC, PA, and TPE: Confirm the particular grade and a compatible repair process; labels alone do not make all grades equally weldable.
- PUR: Be careful. Thermoset polyurethane does not fusion-weld like PP or ABS; a different repair method may be required.
- Mesh-backed patches: Reinforcement can help selected non-critical cracks, but it does not convert a cosmetic repair into a certified safety repair.
Pro Tip: Look for a molded code such as >PP< or >ABS< on the back of the item. Keep sample rods labeled, then make and cool a small test weld on scrap from the same plastic before working on the visible crack.
Ease of Use, Ergonomics, and Setup
The W150 uses a pen-style, non-slip grip for guiding the heated tip along short seams. The original product description lists an 18 cm body length, but the exact size should be checked against the seller details if storage space matters. The metal heater neck has six listed ventilation holes; these do not make it safe to touch.
Choose among the supplied tips according to access and joint width. Rest the tool on its stand while you reposition the part. Unplug it and let it cool fully before changing tips or using the screwdriver near the heated end; never try to loosen a hot tip.
Check the voltage on the actual unit before first use, especially if you are ordering a US-market version for a different electrical system. No verified manufacturer warranty document or replacement-tip specification was found. If future tip availability matters, confirm the mount dimensions and written seller support terms before checkout.
Before your first repair:
- Check the voltage label, power cord, tip attachment, and stand.
- Sort rods by their printed polymer type, not by color.
- Work with local exhaust ventilation, eye protection, and a scrap test piece.
How It Performs in Real Use
The following are practical use cases inferred from the listed features and standard plastic-repair methods. They are not claims that this specific unit was field-tested on each item.
For Car Bumper Covers and Trim
For a minor crack in a removable, non-structural cover or trim piece, the W150 can provide controlled contact heat and matching filler. Check the vehicle maker’s repair rules first. Sensor zones, mounting points, and areas affected by a crash can need a different repair or replacement.
For Kayaks and Outdoor Plastic Gear
A PE rod may be relevant to a PE outdoor container or non-critical kayak accessory, but plastic formulations vary. Do not treat a DIY weld as proof that a kayak hull is watertight or safe to use on open water. Have structural or below-waterline damage evaluated by a qualified repair professional.
For Toys and Household Items
Storage bins, tool cases, and plastic covers make more reasonable practice jobs when their polymer codes are known. Keep repairs away from children’s mouth-contact toys, food items, and anything where a failed joint could injure someone.
For Longer Repair Sessions
The temperature lock may reduce setting changes on a longer seam, and the stand helps during pauses. However, even heat and steady movement matter more than speed. Work in short, controlled sections and stop if you see excessive bubbling, discoloration, or distortion.
How to Use It Correctly
- Confirm a safe repair. Make sure the item is non-structural and the manufacturer permits repair; stop if it is safety-critical.
- Set up safely. Check the voltage label, use the stand and a heat-safe bench, and arrange good local ventilation and eye protection.
- Clean and prepare. Remove grease, paint flakes, dust, loose plastic, and moisture; gently prepare the crack edges as appropriate.
- Identify the plastic. Find the molded resin code and choose a rod that matches the actual material, not just the color.
- Fit a suitable tip while unplugged and cool. Choose a narrow tip for tight work or a wider one for more surface contact.
- Test on matching scrap. Start with controlled heat and adjust gradually. Do not use the highest setting by default.
- Make a steady pass. Soften both the rod and the base material without charring either surface; keep the tip moving.
- Cool, inspect, and finish. Allow the seam to cool naturally before light sanding or checking the bond. Replace the part if the result is uncertain.
Common Mistakes to Avoid
- Choosing a filler rod by color instead of confirmed polymer type.
- Using maximum heat at once, or trusting the LCD number as a measured weld temperature.
- Welding over oil, paint, dust, water, or loose material.
- Pressing a tip in one spot until the surface scorches or warps.
- Handling or changing tips before the tool has cooled and been unplugged.
- Assuming a cosmetically neat bead is safe for a crash-related, loaded, or water-critical part.
Compatibility and Safety
Heating plastics can release irritating or harmful fumes, especially if material overheats. Use effective local exhaust or outdoor ventilation that carries fumes away from you, plus eye protection, suitable heat-resistant gloves, and a stable, heat-safe surface. Keep the hot tool clear of cords, clothing, children, pets, and flammable materials. Follow the instructions supplied with the unit.
Do not repair food containers, baby feeding items, cookware, or mouth-contact toys with this kit. The supplied rods are not shown to have food-contact certification. Likewise, never use this tool for fuel parts, pressurized vessels, live electrical parts, or structural plastics that must maintain their rated strength.
Automotive bumper covers can hide sensors, radar units, impact components, or special factory repair limits. Check the vehicle maker’s instructions before working near any such area. A smooth weld is not proof of safe crash performance, sensor accuracy, or a reliable fastening point. The same caution applies to load-bearing and water-critical boat repairs.
Material and power limits: Confirm the nameplate voltage and plug requirements before connecting the W150. Do not try to force a fusion weld on thermoset PUR or an unidentified plastic. Stop and seek product-specific repair guidance when the plastic softens unpredictably or produces unusual fumes.
Pros and Cons
Pros
- 150W ceramic heater with a fast warm-up claim for short repair jobs.
- Digital display, 200°C to 600°C setting range, and temperature lock for adjustment.
- Four listed tips in three types help with different access and seam widths.
- 106 rods, including 56 material-listed pieces, offer variety for testing.
- Mesh, tape, sandpaper, stand, and brush make the starter kit more complete.
Cons
- Material compatibility is not automatic; some PUR and mixed plastics require a different repair process.
- Seller descriptions disagree on some bundle counts, and replacement-tip compatibility is unconfirmed.
- Not appropriate for structural, sensor-sensitive, water-critical, fuel, or food-contact repairs.
Is It Worth the Price?
The W150 is most appealing as a starter-kit purchase, not as a replacement for professional repair equipment. The 150W tool, digital heat control, four listed tips, 106 rods, mesh, tape, sandpaper, and stand cover much of the setup needed for your first low-risk practice jobs. The value comes from having compatible tools and consumables together, rather than from a guaranteed repair outcome.
It makes the most sense if you have several small, non-critical repairs and can identify each plastic before welding. Compare the seller’s current bundle contents, power rating, tip availability, and support terms before buying. For one damaged safety-related part, replacing it or using an approved professional repair may be the better value.
How It Compares to Alternatives
A basic soldering iron can heat plastic, but it often lacks the W150’s repair-specific rod assortment, tip options, and adjustable digital controls. A hot-air plastic welder is a different approach for wider seams because it warms the base and rod without relying only on contact with an iron tip. It can also demand more airflow control and practice.
A hot stapler uses embedded staples to reinforce certain cracks, rather than supplying a matching polymer filler on its own. Professional nitrogen welding or approved repair adhesives can be better for demanding substrates and repairs. Pick the method based on plastic identification and the consequences of failure, not the number of accessories in the box.
Frequently Asked Questions
Can the GNI W150 fix a car bumper?
It may suit small, non-structural bumper-cover or trim cracks when the material and vehicle-maker repair instructions allow it. Do not weld crash-related structures, sensor zones, or safety-critical mounting points with this kit.
What plastics are listed for the 106 included rods?
Seller descriptions name ABS, PP, PE, TPE, PC, PUR, and PA among 56 material-listed rods, plus 50 colorful rods. These plastics do not all use the same process; confirm the rod marking and base material before working.
Does the temperature really adjust from 200°C to 600°C?
That is the advertised temperature-setting range, with a digital display and lock function. Actual contact temperature and weld quality were not independently measured, so test on matching scrap before a visible repair.
Can you use the kit to repair food containers or baby toys?
Do not use the included rods on food-contact products or items that children put in their mouths. No verified food-contact certification is available for the supplied repair materials.
Will a repaired kayak hull be safe and watertight?
A matching plastic rod alone cannot guarantee hull strength or leak resistance. Have structural, loaded, or below-waterline damage inspected by a qualified kayak repair professional before using the boat.
Are the four welding tips universal replacements?
Do not assume they are universal. The referenced kit lists four tips, but some seller pages show another count. Check the mounting dimensions, package photo, and compatible replacement parts before buying.
How should you prepare a plastic crack before welding?
Remove oil, dirt, paint flakes, moisture, and loose plastic, then prepare the seam as suitable for the polymer. Check its molded resin code and practice with the matching rod on scrap from the same material.
Who should skip the GNI Plastic Welder?
Skip it if your job is structural, sensor-sensitive, fuel-related, food-contact, or otherwise safety-critical. It is also the wrong choice if you cannot identify the base plastic or use a properly ventilated work area.
The Bottom Line
The GNI W150 Plastic Welder is a well-stocked DIY option for small, non-critical repairs when you can identify the plastic and practice first. Its 150W heater, adjustable digital controls, four listed tips, and 106 rods offer useful flexibility, but no kit can make a mismatched or unsafe repair reliable. Choose a professional or approved replacement for safety-related vehicle parts, stressed kayak hulls, and food-contact items.