Disclosure: As an Amazon Associate, we earn from qualifying purchases. If you click a link on this page and make a purchase, we may receive a small commission at no extra cost to you.
Repairing a cracked bumper cover, kayak, toy, or storage bin depends on matching the plastic, filler rod, tip, and heat. The GNI Plastic Welder gives DIY users a 150W ceramic-core tool with an LCD display, temperature lock, four tips, and 106 assorted rods. That bundle reduces the extras you need for practice, but it does not remove the learning curve or make every repair safe. This review explains where the kit fits, how to use it carefully, and which jobs should go to a professional.
Quick Verdict
Rating: 8.4/10
Best For: DIY plastic repair on non-structural bumpers, kayaks, toys, panels, and small parts.
Bottom Line: The GNI Plastic Welder is a well-equipped starter kit if you want visible heat control, multiple tip shapes, and a broad rod assortment. The tradeoff is that durable results still depend on correct material matching, surface preparation, and practice.
| Specification | Detail |
|---|---|
| Brand | GNI |
| Product type | Plastic welding repair kit |
| Power | 150W ceramic-core heating tool |
| Heat-up claim | About 15 seconds to reach working temperature |
| Temperature control | LCD display with temperature lock; supplied working range is 200°C to 600°C |
| Tips | Four interchangeable tips for different repair shapes and part thicknesses |
| Included rods | 106 assorted rods; supplied materials include ABS, PP, PE, TPE, PC, PUR, and PA |
| Grip and size | Pen-shaped, non-slip grip; supplied body length is 18 cm |
| Accessories | Mesh, sandpaper, stand, brush, screwdriver, and repair accessories are listed |
| Best use | Non-structural plastic repairs, test pieces, hobby work, and small DIY restoration jobs |
| Safety note | Use ventilation, eye protection, heat-resistant gloves, and a heat-safe work surface. |
What Is the GNI Plastic Welder?
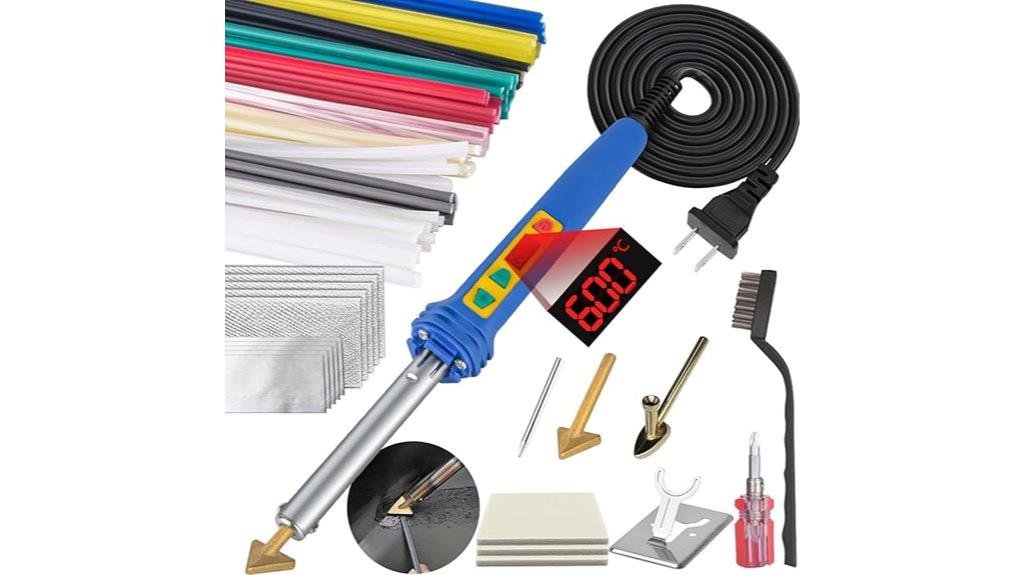
The GNI Plastic Welder is a handheld repair tool that softens a compatible filler rod and the surface of a thermoplastic part so you can join, fill, or reinforce a crack. The kit combines the heated tool with four tips, assorted rods, repair mesh, sandpaper, a stand, a brush, and a screwdriver for common DIY preparation and finishing tasks.
The main selling point is adjustable heat. The supplied product information lists a 150W ceramic heating core, an LCD temperature display, a temperature lock, and a 200°C to 600°C working range. Those controls give you a better starting point than a fixed-heat iron, especially when you move between thin trim, thicker panels, and flexible plastics.
The tool is still only part of the repair. A clean joint, a matching rod, a suitable tip, and controlled movement matter more than simply selecting the highest temperature. You should treat visible or high-stress parts as practice-sensitive jobs, and avoid structural, safety-critical, fuel-system, or food-contact repairs.
Key Takeaways
- The 150W ceramic-core tool is designed for quick warm-up and steady DIY repair sessions.
- The LCD and temperature lock help you keep heat more consistent across longer seams.
- The kit includes 106 assorted rods and four tips, so you can start without buying many extras.
- The pen-shaped, non-slip grip gives better control on narrow cracks and small plastic parts.
- You still need to match the rod, temperature, and tip shape to the plastic you are repairing.
Before You Buy: This tool is best for non-structural plastic repair. Do not rely on it for load-bearing automotive parts, safety components, food-contact items, or plastic you cannot identify.
Who Should Buy It?
Best For
- DIYers repairing cracked plastic trim, toys, bins, panels, kayak areas, or bumper covers.
- Users who want visible temperature control instead of a fixed-heat repair tool.
- Buyers who prefer a starter kit with rods, tips, mesh, sandpaper, and small accessories included.
Skip If
- You need a certified repair for a structural or safety-critical automotive part.
- You want a tool for food-contact plastic, fuel-system parts, or unknown materials.
- You are not willing to test on scrap plastic before repairing the visible part.
Heating Performance and Temperature Control Features
The 150W ceramic core is the main performance feature. The supplied product information claims about 15 seconds to reach working temperature, which can reduce downtime between short repairs and practice passes. Treat that figure as a listing claim because actual warm-up can vary with the selected temperature and working conditions.
The LCD screen and temperature lock make the tool easier to manage than a basic fixed-temperature iron. The supplied range is 200°C to 600°C, but the number on the display is only a starting point. Plastic type, wall thickness, tip contact, movement speed, and rod match all affect whether the joint fuses or overheats.
For thinner ABS-style parts, begin with lower heat and a smaller tip to reduce burn-through. Thicker PE-style repairs may need more heat or a broader tip to warm the rod and base plastic evenly. Increase temperature in small steps and test on scrap or a hidden area before touching the visible surface.
What’s Included in the Complete Repair Kit
The kit offers more practical starting value than a bare-tool purchase because it includes the welding gun, rods, tips, and basic preparation accessories. A first-time user can test several materials and tip shapes before deciding which consumables are worth replacing in larger quantities.
| Component | Quantity | Why It Matters |
|---|---|---|
| Plastic welding gun | 1 | 150W tool with LCD temperature control. |
| Welding rods | 106 | Assorted materials help you match ABS, PP, PE, and other listed plastics. |
| Interchangeable tips | 4 | Different tip shapes help with grooves, edges, wider seams, and small repairs. |
| Accessories | Mesh, sandpaper, stand, brush, screwdriver | Useful for prep, reinforcement, cleaning, and safer tool placement. |
Tip Selection and Material Matching
Plastic welding works best when the repair rod matches the base material. If the base part is PP, use a PP rod. If it is ABS, use an ABS rod. A mismatch can look acceptable at first but fail once the part flexes, heats up, or gets bumped.
The four tips give you more control over the weld shape. A narrow or precision tip works better for small cracks, toys, and thin panels. A broader tip is more useful for thicker plastic or longer seams because it spreads heat across a wider area.
- ABS repairs: Start with moderate heat and avoid staying in one spot too long.
- PP or PE repairs: Use the matching rod and expect more practice because these plastics can be slick and flexible.
- Small PC, TPE, PUR, or PA parts: Work slowly, test first, and avoid overheating the surface.
- Reinforced cracks: Use the included mesh where extra backing support makes sense.
Pro Tip: Look for the molded plastic code on the broken part before choosing a rod. Matching the rod to the material matters more than using the highest heat setting.
Ease of Use, Ergonomics, and Setup
The pen-shaped, non-slip body helps when you need steady hand control along a narrow seam. The supplied product information lists an 18 cm body length, which should keep the tool compact enough for small work areas while leaving room for a full grip.
Four interchangeable tips let you match the contact area to the repair instead of forcing one shape to handle every crack. Use a finer tip for narrow grooves and small parts, then move to a broader tip when you need to spread heat across a wider bead or mesh-backed patch. Let the tool cool before changing hot parts, and place it on the included stand whenever you pause.
The supplied product information mentions lifetime after-sale service, but warranty coverage and replacement-tip availability can vary by seller and listing. Confirm the current terms, compatible tip dimensions, and support contact before purchase if you expect frequent use.
How It Performs in Real Use
For Car Bumper Covers and Trim
The GNI Plastic Welder makes the most sense for non-structural bumper covers, tabs, interior trim, and small cosmetic cracks. It can help you tack, fill, and reinforce plastic, but it should not replace a certified repair for crash structures or safety-related parts.
For Kayaks and Outdoor Plastic Gear
For kayaks, bins, and outdoor plastic gear, material matching is the biggest challenge. Many of these items use PE or similar plastics, so you should identify the plastic, clean the area, and test rod adhesion before repairing a large visible crack.
For Toys and Household Items
Small toys, storage pieces, handles, and plastic panels are good practice projects because they let you learn heat control on lower-risk parts. The precision tips help when you need to work around corners or narrow cracks.
For Longer Repair Sessions
The temperature lock and included accessories help during longer seams, but your results still depend on pace. Move slowly enough to melt the rod and surface together, but not so slowly that the plastic scorches, bubbles, or warps.
How to Use It Correctly
- Clean the repair area. Remove dirt, grease, paint flakes, moisture, and loose plastic before heating.
- Identify the plastic. Check the molded material code and choose the matching rod whenever possible.
- Choose the tip. Use a narrow tip for small cracks and a broader tip for wider seams or reinforced areas.
- Practice on scrap first. Test the temperature, movement speed, and rod before touching the visible surface.
- Start with controlled heat. Increase the setting in small steps only when the rod and base plastic are not fusing.
- Blend the rod with the base material. Move steadily so both surfaces soften together without scorching, bubbling, or collapsing.
- Let the repair cool naturally. Avoid stressing, sanding, painting, or bending the joint while it is still warm.
Common Mistakes to Avoid
- Using a rod that does not match the molded plastic code.
- Starting at maximum heat instead of testing a lower setting first.
- Welding over grease, paint, moisture, or loose material.
- Holding the tip in one place long enough to warp or burn through the part.
- Testing the joint strength before the plastic has cooled fully.
- Using a DIY weld on a structural, safety-critical, fuel-system, or food-contact part.
Compatibility and Safety
This tool uses high heat and can produce irritating fumes when plastic is overheated. Work in a well-ventilated area, wear safety goggles and heat-resistant gloves, use a heat-safe surface, and keep the hot tip away from skin, cords, flammable materials, and finished surfaces.
The included rods are not presented as food-contact certified. Do not use them on cups, cutting boards, food containers, baby feeding items, or cookware unless you have certified food-grade repair material and appropriate guidance.
For automotive repairs, use caution. Cosmetic plastic repairs are different from structural or safety repairs. If the part affects crash performance, steering, braking, fuel, airbags, or seat mounting, replace it or get professional repair advice.
Pros and Cons
Pros
- 150W ceramic core gives the tool enough power for common DIY plastic repairs.
- LCD display and temperature lock make heat control easier than with fixed-heat tools.
- Four interchangeable tips help you match crack size, part thickness, and bead shape.
- 106 assorted rods give you more practice material and better starting flexibility.
- Compact, non-slip pen grip supports careful work on smaller parts and edges.
Cons
- Not suitable for structural, safety-critical, fuel-system, or food-contact repairs.
- Good results require correct rod matching, surface prep, and practice on scrap plastic.
- Replacement tip fit and warranty coverage should be verified before buying extras.
Is It Worth the Price?
The GNI Plastic Welder offers strong starter-kit value if you want one package for heat control, rod testing, surface preparation, and small repairs. The included rods, four tips, mesh, sandpaper, stand, brush, and screwdriver reduce the number of extras you need before your first practice session.
It is worth considering if you expect several non-structural repairs and want more control than a fixed-temperature soldering iron provides. The main limitation is skill and material identification: the tool supplies heat and filler, but it cannot confirm the plastic type or guarantee a durable bond.
How It Compares to Alternatives
Compared with a basic soldering iron, the GNI kit is more repair-focused because it includes matching rods, multiple tip shapes, mesh, and LCD heat control. A hot-air plastic welder may cover large or wide seams more efficiently, but it usually needs more space, airflow control, and practice.
A hot stapler adds mechanical reinforcement across a crack, while this rod-style welder focuses on melting, filling, and blending compatible plastic. Tabs and high-flex areas may benefit from reinforcement plus surface filling, but no DIY method should replace a certified repair on a structural or safety-related component.
Frequently Asked Questions
Can the GNI Plastic Welder fix a car bumper?
It can help with non-structural bumper cover cracks, plastic tabs, and cosmetic plastic repair. Do not use it as a substitute for certified repair on load-bearing or safety-related automotive parts.
What plastics can you use with the included rods?
The supplied product information lists ABS, PP, PE, TPE, PC, PUR, and PA among the included rod materials. For the strongest bond, match the rod to the molded plastic code on the part you are repairing.
Is the temperature range 200°C to 600°C?
The supplied product information states a 200°C to 600°C working range with an LCD display and temperature lock. Because listings can change, verify the exact current range on the product page before buying.
Are the included rods safe for food containers?
No food-contact certification is stated in the supplied product information. Avoid using the included rods on food containers, baby feeding items, cookware, or cutting boards unless you have certified food-safe materials and proper guidance.
Do you need to sand the repair area first?
Light sanding can improve preparation by removing loose plastic and creating a better surface for the weld. Clean the area before heating, and avoid leaving dust, grease, paint flakes, or moisture in the joint.
Are replacement tips universal?
You should not assume universal fit. Check the tip mounting style, size, and seller guidance before buying replacements, especially if you plan to use the tool often.
What safety gear should you use?
Use safety goggles, heat-resistant gloves, long sleeves, and a heat-safe work surface. Good ventilation is also important because heated plastic can produce irritating fumes.
Who should skip this plastic welder?
Skip it if you need a certified structural repair, a food-safe repair method, or a tool that requires no practice. It is also not ideal if you cannot identify the plastic material before choosing a rod.
The Bottom Line
The GNI Plastic Welder is a practical choice for DIY users who want a compact starter kit with a 150W ceramic core, LCD control, four tips, and 106 assorted rods. Buy it for non-structural repairs where you can identify the plastic, prepare the surface, and practice first. Skip it for safety-critical automotive parts, food-contact plastic, unknown materials, or repairs that need certified professional work.