
Disclosure: As an Amazon Associate, we earn from qualifying purchases. If you click a link on this page and make a purchase, we may receive a small commission at no extra cost to you.
GLITTER Spot Welder 801D Review
Weak welds can loosen nickel strip, damage battery packs, and force you to rebuild completed cell groups. Too much energy creates a different problem by burning through thin material or adding unnecessary heat near the cell.
The GLITTER Spot Welder 801D gives you capacitor-based pulse welding, 0–99T energy adjustment, and two ways to position the electrodes. Its strong output suits regular battery-pack work, but you still need careful setup, test welds, and sound lithium-battery safety practices.
This review explains the 801D’s verified specifications, welding range, controls, setup requirements, limitations, and best use cases.
Quick Verdict
Rating: 8.4/10
Best For: DIY battery builders and small repair shops that regularly weld nickel strip on cylindrical cells or compatible composite strip on LiFePO4 terminals.
Bottom Line: The GLITTER 801D combines strong pulse output with fine energy control, a fixed welding arm, and a mobile pen. It offers more flexibility than a basic handheld welder, but correct pressure, clean electrodes, and test welds remain essential.
Key Takeaways
- The 801D is a capacitor energy-storage pulse spot welder designed for battery-pack assembly, repair, and compatible metal-tab work.
- Its listed maximum output is 14.5kW, with 290J peak welding energy and an Amazon listing claim of up to 2,500A peak pulse current.
- You can adjust output from 0–99T and choose AT automatic triggering or MT foot-pedal control.
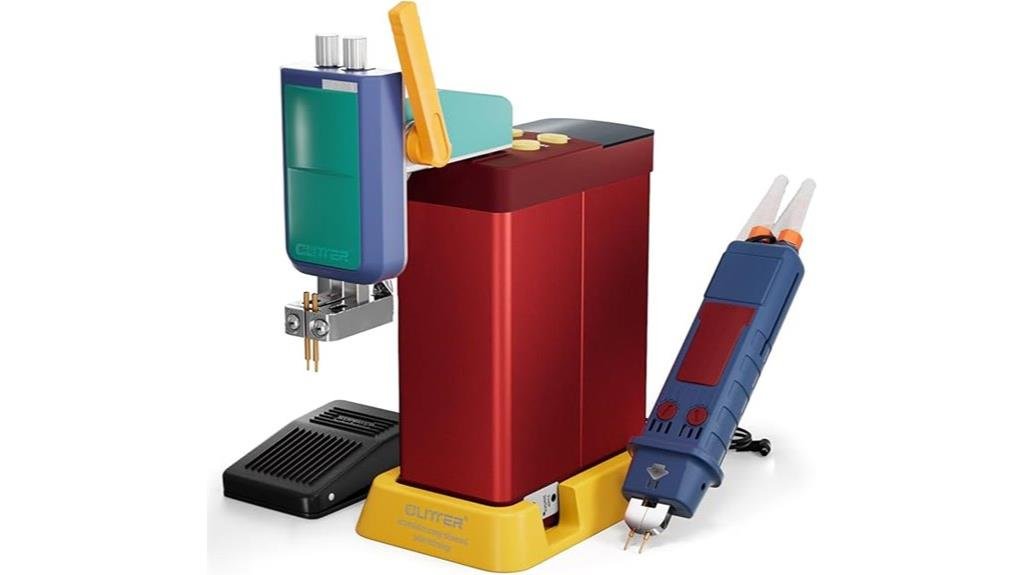
- The reviewed configuration combines a 73SA handle-push welding arm with a 73B mobile welding pen.
- Listed material ranges include 0.05–0.3mm pure nickel, 0.1–0.4mm nickel-plated strip, and 0.05–0.15mm aluminum-nickel composite strip.
- It is not an automated production machine, and it will not correct poor strip contact, dirty electrodes, unsafe cell preparation, or incorrect settings.
Key Specifications
| Specification | Detail |
|---|---|
| Brand | GLITTER |
| Model | 801D |
| Product Type | Capacitor energy-storage precision pulse spot welder |
| Maximum Pulse Power | 14.5kW |
| Peak Welding Energy | 290J |
| Listed Peak Pulse Current | Up to 2,500A, according to the reviewed Amazon listing |
| Energy Adjustment | 0–99T energy grades |
| Trigger Modes | AT automatic mode and MT foot-pedal mode |
| Welding Methods | Handle-push arm welding and mobile-pen welding |
| Pulse Time | 0–20ms |
| Preload Delay | 200–500ms |
| AC Input | 100–240V, 50/60Hz |
| Adapter | 15V, 2A–3A maximum |
| Capacitor Working Voltage | Approximately 5.4–5.8V before welding |
| Initial Charging Guidance | Allow roughly 30–40 minutes before first use and confirm the working voltage on the display |
| Pure Nickel Range | 0.05–0.3mm on 18650 battery applications |
| Nickel-Plated Range | 0.1–0.4mm on 18650 battery applications |
| Composite Strip Range | 0.05–0.15mm aluminum-nickel composite strip for compatible LFP aluminum electrodes |
| Machine Dimensions | Approximately 176 × 126 × 67mm, or 6.9 × 5.0 × 2.6 inches |
| Listed Weight | Approximately 8.4 lb for the reviewed setup |
| Body Material | Aluminum alloy shell |
| Display | LED display for capacitor voltage, energy grade, mode, and instantaneous welding current |
| Reviewed Accessories | 73SA welding arm, 73B mobile pen, foot pedal, base, adapter, and related setup hardware |
| Supported Battery Work | Compatible tab work for NiMH, NiCd, lithium-ion, lithium-polymer, and rechargeable battery packs |
| Warranty | One-year limited manufacturer warranty |
How We Reviewed This Product
We compared the Amazon product identity with the manufacturer’s 801D specifications and operating manual. We then evaluated the controls, included tools, welding ranges, setup requirements, safety needs, buyer fit, and practical limitations without relying on changing prices or stock claims.
What Is the GLITTER Spot Welder 801D?
The GLITTER 801D is a compact capacitor-discharge spot welder for joining battery tabs and compatible thin metal strips. Its internal capacitors store energy and release it in a short pulse instead of drawing the full welding load directly from the wall during each weld.
The machine sits above simple fixed-output handheld welders because you can adjust the energy through 99 grades. You can also choose a stable handle-push arm for bench work or connect the mobile pen when the pack does not fit comfortably under the fixed electrodes.
It is intended for battery builders, electronics repair users, and small workshops that need repeatable welds without moving to a large industrial production system.
Who Should Buy the GLITTER 801D?
Best For
- DIY builders who regularly assemble 18650 or similar cylindrical-cell packs with pure nickel or nickel-plated strip.
- LiFePO4 builders who use compatible aluminum-nickel composite strip within the stated thickness range.
- Small repair shops that benefit from both a fixed welding arm and a mobile pen.
Skip If
- You need automated feeding, production tracking, or an industrial continuous-duty system.
- You only expect to make one or two basic repairs and do not need 99-step adjustment.
- You lack the tools or knowledge needed to test cells, insulate packs, prevent shorts, and verify weld quality.
Before You Buy: Confirm the exact Amazon bundle before ordering. GLITTER sells the 801D with several welding-pen and accessory combinations, so the included pen, arm, fixture, and small tools can vary between packages.
Feature Deep Dive
Design and Build Quality
The 801D uses a compact aluminum alloy shell that measures about 176 × 126 × 67mm. The metal housing gives the machine a sturdier bench-tool feel than lightweight plastic handheld welders while helping the body release heat.
The main unit fits vertically into the included base. This setup steadies the welder while you use the 73SA arm and reduces unwanted movement as you position a cell and strip beneath the electrodes.
The listed setup weighs about 8.4 lb, so you can move it between work areas without treating it as permanent shop equipment. However, the reviewed package does not list a dedicated carrying case, and the pen, pedal, electrodes, and cables need organized storage.
Pulse Power and Welding Capability
GLITTER lists 14.5kW maximum pulse output and 290J peak welding energy. The Amazon listing also advertises up to 2,500A peak current, which refers to the brief welding pulse rather than continuous current output.
The manufacturer lists a 0.05–0.3mm range for pure nickel strip and a 0.1–0.4mm range for nickel-plated strip on 18650 applications. The 801D also supports 0.05–0.15mm aluminum-nickel composite strip on compatible LiFePO4 aluminum electrodes.
Those maximum ranges are not automatic guarantees for every strip or cell. Material purity, electrode pressure, tip condition, cell surface, pulse setting, and strip flatness all affect the finished joint.
Energy Control and Pulse Settings
The 0–99T adjustment range is one of the 801D’s strongest features. It gives you room to start low, test the joint, and increase the setting gradually instead of applying the same output to every strip thickness.
The machine supports a 0–20ms pulse time and a 200–500ms preload delay. The preload period gives you time to establish electrode contact before the machine releases the welding pulse.
This control is useful when you switch between thin nickel tabs and thicker material. It also introduces a learning curve because the highest setting is rarely the correct starting point.
Fixed Arm and Mobile Welding Pen
The 73SA handle-push arm gives you a stable vertical electrode position for straight cell rows and repeatable bench work. It works best when the pack can sit flat and the tab reaches the welding points without bending.
The 73B mobile pen lets you reach angled connections, assembled packs, and layouts that do not fit beneath the fixed arm. Its adjustable pin spacing also helps you position both electrode tips on a narrow strip.
The pen offers more reach, but your hands control its pressure and angle. Uneven pressure can create inconsistent welds even when the energy setting stays unchanged.
Display, AT Mode, and MT Mode
The LED display shows the capacitor voltage, selected energy grade, trigger mode, pulse information, and instantaneous welding-current reading. This feedback helps you confirm that the capacitor has charged and that the machine is ready for the next weld.
AT mode triggers the pulse automatically after the electrodes establish contact and the preset delay passes. It can speed up repeated welds once you have confirmed the correct setting and pressure.
MT mode uses the foot pedal. This mode gives you more control while testing settings because you can position the strip and electrodes before deciding when to trigger the pulse.
Power Input and Initial Setup
The adapter accepts AC 100–240V at 50/60Hz, which suits common household electrical systems when you use the correct local plug. The machine uses a 15V, 2A–3A adapter to charge its internal capacitors.
Before the first welding session, connect the correct adapter and allow the capacitors to charge. The display should settle within the working range, approximately 5.4–5.8V, before you begin welding.
Connect the pen or fixed arm firmly, install the foot pedal when using MT mode, and check that all electrode connections are tight. A loose connector adds resistance and can make otherwise correct settings produce weak results.
Pro Tip: Make your test weld with the same strip material and thickness used in the finished pack. Increase the energy one step at a time, then perform a peel test instead of judging the weld only by its appearance.
How It Performs in Real Use
For 18650 Battery Pack Builds
The 99-step adjustment gives you useful control when moving between 0.1mm, 0.15mm, 0.2mm, and thicker nickel strip. MT mode is especially practical during the first cell group because you can hold the strip steady with both hands and trigger the weld with your foot.
Once the setting is confirmed, the fixed arm can improve consistency across straight rows. You still need to keep each strip flat because an air gap between the strip and cell cap weakens the joint.
For LiFePO4 Projects
The stated 0.05–0.15mm aluminum-nickel composite range gives the 801D a role beyond ordinary cylindrical-cell packs. This material requires the correct orientation, clean contact surfaces, and a setting tested on an unused sample.
Do not assume that a setting used for pure nickel will produce the same result on composite strip. The materials conduct and heat differently, so pressure and pulse energy need separate testing.
For Battery Repair Work
The mobile pen is useful when replacing a damaged connection inside a partly assembled pack. It reaches locations that may not fit under the fixed arm and reduces the need to dismantle more of the pack than necessary.
Repair work also carries more risk because nearby tabs may remain energized. Isolate exposed conductors, remove jewelry, cover adjacent terminals, and avoid placing tools where they could bridge two points.
For Repeated Small-Shop Use
The fixed arm, foot pedal, and automatic mode create a more controlled workflow than a basic pocket welder. The display also helps you notice changes in capacitor voltage or welding current during a longer batch.
The 801D still lacks automated strip feeding, pack positioning, cycle counting, and industrial process controls. It suits careful bench work better than high-volume manufacturing.
Setup Tips and Common Mistakes to Avoid
- Start below the expected setting. Increase energy gradually until the weld survives a peel test without puncturing the strip.
- Keep the strip flat. A visible gap between the strip and terminal can create sparks, weak fusion, or surface marking.
- Apply even electrode pressure. Both tips should contact the strip at the same time and with similar force.
- Clean the electrode tips. Oxidation and debris increase resistance and change the amount of energy reaching the joint.
- Do not reuse one setting for every material. Pure nickel, plated steel, and composite strip need separate test settings.
- Check every cell before assembly. Do not weld damaged, swollen, leaking, overheated, or unidentified cells.
- Inspect the weld mechanically. A neat-looking mark can still hide a weak connection that fails under vibration or current load.
Pros and Cons
Pros
- 14.5kW maximum pulse output and 290J peak energy suit a broad range of battery-tab work.
- 0–99T adjustment provides finer control than fixed-output handheld welders.
- AT and MT modes support both repeated automatic welds and deliberate foot-pedal triggering.
- The 73SA arm and 73B pen cover flat bench work and harder-to-reach pack layouts.
- The compact aluminum body and removable accessories fit a small workshop.
Cons
- Finding the correct energy and pressure requires scrap-strip testing and mechanical weld checks.
- Accessory bundles vary, so you must confirm which pen, arm, fixture, and tools the seller includes.
- It does not provide the automation, tracking, or continuous workflow of an industrial production welder.
Is It Worth the Price?
The GLITTER 801D fits the mid-range to advanced DIY category. You pay for capacitor pulse output, 99-step adjustment, two trigger modes, a live display, and the ability to switch between fixed-arm and mobile-pen welding.
It offers strong value for the price when you build or repair packs regularly. The added control can reduce wasted strip and damaged cells after you learn how to match the setting, pressure, and electrodes to each material.
It provides less value for a one-time repair or for buyers who expect the machine to choose the correct setting automatically. The 801D rewards careful setup rather than replacing it.
How It Compares to Alternatives
The GLITTER 801A is worth comparing when you need a simpler lower-output machine for lighter nickel-strip work. The GLITTER 801H sits higher in the same product family and may suit buyers who need more output for demanding battery projects.
A SUNKKO 737G-style transformer welder uses a different power-delivery approach and usually takes up more bench space. The 801D makes the most sense when you prefer compact capacitor storage, fine energy adjustment, and both fixed and mobile electrode options.
Compatibility, Safety, and Maintenance
Battery spot welding carries fire, burn, electrical, and short-circuit risks. Wear safety glasses, remove metal jewelry, use insulated tools, and work on a clean, nonflammable surface with an appropriate emergency plan.
Check polarity, cell condition, insulation rings, strip placement, and nearby conductors before every weld. Never weld a swollen, punctured, leaking, overheated, heavily corroded, or unidentified cell.
A spot welder does not replace a battery-management system, proper cell matching, pack insulation, fusing, strain relief, or safe enclosure design. Seek qualified guidance when you are unfamiliar with pack voltage, current demand, or protection requirements.
Clean the electrode tips regularly and replace them when they become badly pitted or misshapen. Inspect the adapter, pedal, connectors, and welding cables before long sessions, then unplug the adapter when the machine is stored.
Frequently Asked Questions
Does the GLITTER 801D work for 18650 battery packs?
Yes. The 801D is designed for battery-pack assembly and repair, including 18650 applications. Its listed ranges cover 0.05–0.3mm pure nickel and 0.1–0.4mm nickel-plated strip when the material, pressure, and energy setting are suitable.
Can the GLITTER 801D weld pure nickel strip?
Yes. GLITTER lists a pure-nickel range of 0.05–0.3mm for 18650 battery applications. Begin with a low setting and verify the weld through a peel test before using the same setting across a full pack.
What is the difference between AT and MT mode?
AT mode triggers the weld automatically after contact and the selected delay. MT mode requires the foot pedal, giving you more control while positioning the strip, testing settings, or working on an awkward pack layout.
Does the welder include a foot pedal and mobile welding pen?
The reviewed Amazon configuration lists a foot pedal, 73SA handle-push arm, base, and 73B mobile pen. GLITTER also sells other 801D bundles, so check the current package list on the product page before ordering.
Does the GLITTER 801D need charging before first use?
Yes. The capacitors are discharged for transport, so the unit needs time to charge after setup. Wait until the display reaches the working-voltage range before making your first test weld.
How do you know whether a spot weld is strong enough?
Test a sample by peeling the strip away from the welded surface. A useful weld should resist removal and normally tear or deform the strip around the weld points rather than separating cleanly with little force.
What causes inconsistent welds with the 801D?
Common causes include dirty or worn electrode tips, uneven hand pressure, loose connectors, curved strip, gaps beneath the material, and a setting that does not match the strip. Correct the physical setup before raising the energy.
Is the GLITTER 801D suitable for beginners?
A careful beginner can learn to use it, but the machine is not a no-skill tool. You need basic battery-safety knowledge, scrap material for testing, a way to check cell condition, and enough patience to verify each setting before welding real cells.
The Bottom Line
The GLITTER Spot Welder 801D is a strong choice for regular DIY battery builders and small repair shops that need adjustable capacitor pulse welding. Its main strengths are the 14.5kW output class, 99-step control, two trigger modes, and choice of fixed-arm or mobile-pen welding.
Skip it when you need a fully automated industrial system or do not want to test settings and inspect welds. For careful users, the 801D earns its 8.4/10 rating by combining useful power, compact size, and flexible controls with a manageable learning curve.
Ready to Buy?
Check the latest package contents, price, and product details before you decide.


[…] For: Permanent jewelry artists, small jewelry repair benches, and mobile operators who need fine spot welding […]